- Home
- Learn About Antique Furniture and Reproductions
- Resources
- Reproduction Furniture Decorating Tips
- Editing Your Antique Reproduction Furniture Photos: Basics and Tips
Editing Your Antique Reproduction Furniture Photos: Basics and Tips
We hope you enjoyed our Beginner Tips and Tricks for Photographing Your Reproduction Furniture and Antiques. We greatly enjoy sharing all aspects of the world of antiques with you, and while you've learned how to set up the perfect shot—what about editing those photos?
In this second article, we'd like to help fellow collectors out further by sharing a few tips on how to edit your reproduction furniture photos for a beautiful picture that captures the essence and elegance of your piece or pieces.
What is Photo Editing?
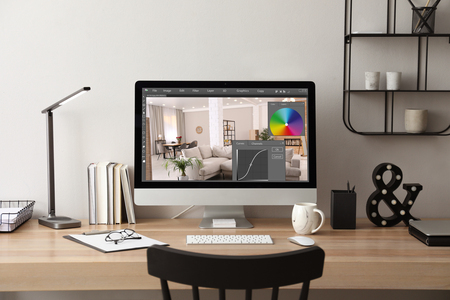
Whether new to taking photographs of your collection or just seeking a refresher, photo editing is taking an image and enhancing, manipulating, or fixing imperfections. With today's technology, this process often no longer needs an expensive dark room and developing chemicals and, instead, can be done with digital photo editing software.
Photo editing can be as straightforward as basic tweaks such as cropping a photo and adjusting saturation or brightness. It can include more advanced techniques, like removing graininess, erasing an unwanted addition to the photo (think a spot of pet hair on a chair) to swapping faces, and changing backgrounds completely.
Some editing of your photos may already be offered manually through your digital device's programs, such as the photo app, which comes with most cell phones.
In general, most edits are handled by software.
Why Should You Bother With Editing Your Photos?
When we take a photo, our cameras capture it in what is known as RAW format, whether within the camera application or whether we've chosen to shoot with RAW or JPEG.
If you choose to have your camera set to shoot and save as a JPEG, the camera then takes the original RAW photo file. It will then add saturation to the colors, apply contrast, noise reduction, and a bit of sharpening with perhaps other edits, depending on the camera, the camera app, or the cell phone. After the changes are added, the file is flattened and processed to give you the JPEG file.
Although this, in theory, sounds positive, just like allowing your camera to shoot in AUTO mode, it's generally not the best option for getting the best images. One reason is that your camera does not know what you just took a photo of or whether or not it needs the adjustments it automatically applies to your image. It blindly applies a pre-set amount of editing whether or not the photo turned out perfect the first time.
If possible, we recommend setting your camera to shoot images in RAW format. When processing the image, you can spot how little or how much editing it needs better than any camera.
Editing a photo will help you fine-tune it to get the best image possible; in some cases, editing a picture you may not like can give you a second chance to improve it without having to re-take it. In particular, if you sell collected antiques and reproductions, a niche photo that is edited properly can help cement your branding and optimize business goals.
Beginner Friendly Photo Editing Software
Before you begin editing, you may want to find a beginner-friendly photo editing software that works for you. Some of today's best photo editing software available for use with your Android or iPhone, home Windows PC and Mac are:
Free For Android:
- - Picsart
- - Snapseed
- - Canva
- - Pixlr
- - Google Photos
- - Photoshop Express Photo Editor
Free for iPhone:
- - Snapseed
- - Google Photos
- - Apple Photos
- - Photoshop Express Photo Editor
Free For Windows PC:
- - PhotoDirector Essential
- - Pixlr
- - Canva
- - Fotor
Free for Mac:
- - Apple Photos
- - Lumnar Neo
- - Fotor
- - Pictorial
Choosing a photo editing software that is right for you is an excellent step toward editing your photos, as once you find what works and what doesn't, you'll be more comfortable with the program and be able to edit your photos more seamlessly with time and practice.
Beginner Editing Basics
When it comes down to opening and editing the software of your choice, each piece has its unique aspects and features, but all of them will probably share the essential tools for photo editing. Below, we'll explain the basics and how they work.
- 1. Crop and Straighten
Depending on your chosen software, the ability to crop your photo and straighten it may be bundled together or two separate actions. In general, straightening an image is used to correct the photo's horizon—or to level the angle if it was taken slightly off center.
Cropping a photo is the act of trimming out a portion (usually peripheral or the edges of the photo) to help draw attention to the main subject. For example, if you took a picture of your favorite antique reproduction couch, but the room is cluttered around the sofa, and in the photo, you may want to use crop to get rid of the business around the couch to draw a viewer's eye directly to it.
One important thing to note: when you crop an image, cropping removes portions of the image, and that can change the original size, shape, height, and width ratio, making it more difficult to enlarge. Cropped photos that are enlarged can often turn out grainy, fuzzy, or pixelated. - 2. Resize
Resizing will change the size and dimensions of the photo you took, but it will constrain it to retain the same shape, height, and width ratio without losing too much detail. Resizing is an excellent choice for those looking to maintain clarity and don't want to run into any issues with graininess they may encounter after cropping a photo.
For a quick example, measurement in digital photos is generally done in pixels. A picture you take and wish to upload to Instagram should be resized to fit Instagram's pixel limitations. Perhaps you want to showcase a landscape photo of your favorite Victorian parlor chair on Instagram. In that case, you should resize the image to 1080x566 pixels for the most precise, best photo presentation on that social media.
For a personal blog, such as WordPress, the default best size for a blog post image is roughly 1200x630 pixels, while a featured image size displays best at approximately 1200x900. Using the resize option within photo editing software, in most cases, will preserve the details of your image while allowing you to upload it and have it rendered or displayed appropriately without seeming squished or fuzzy. - 3. Sharpen
Sharpening is the act of enhancing the definition of the edges found within an image. Sharpening cannot take an already blurry photo and make it focus; however, sharpening can take soft edges and make them clearer to see. If you oversharpen, you may find the image becomes too grainy. - 4. Noise Reduction
Occasionally, we may take a gorgeous photo of our furniture but notice it is grainy or noisy. In that case, you may want to apply noise reduction. Noise reduction reduces pixel size and smoothes the image, but be careful not to use it at full strength as it can remove the photo's details and make it look out of focus. - 5. White Balance. White balance controls the color balancing within a photo, which can help make colors look more realistic. It establishes a baseline for measuring all the other colors by setting the actual color of white in your photo, and it removes unrealistic color casts so that objects appear pure white. For example, some pure white clothing appears white to the naked eye in sunlight, but when photographed, it can often have a blue or grey cast on the photo. White balance helps remove those casts to white.
- 6. Contrast is the difference between the brightness of light and dark areas of the photo. Contrast determines the number of different shades in the image. Low-contrast images often appear more 'flat' with fewer details and look soft. Higher contrast retains and enhances detail dimension, making a photo look crisper.
- 7. Exposure
In essence, exposure makes a photo brighter. But what does exposure do that is different from brightness? Exposure is the physical measurement of light, while brightness is a subjective perception of light. Exposure is the amount of light that reaches your camera's sensor.
If you brighten your photo with exposure by using advanced techniques such as a slower shutter speed or a higher ISO, the images you take become brighter. But if you increase the light by brightness, the brightness does not touch or affect the photo's exposure and will not change. - 8. Saturation
Saturation controls the intensity of the color within a photo. For example, to add a pop of brightness to a gorgeous red fabric, you may want to increase the saturation to boost the color, making it appear more vivid. This is especially helpful if the original photo's lighting does not capture the proper shade of the object you are photographing. - 9. Temperature
Temperature is a system that uses numerical values to measure the color characteristics of a light source. Think of the sun. In the morning and evening, sunlight takes on a warm, golden glow, while at noon, sunlight tends to be harsh, bright, and white or blue.
You can use temperature to add warm, golden hues to your light by choosing warmth or make it clearer, whiter, or blue-bright by sliding toward colder temperatures. - 10. Tint
In photo editing, a tint refers to adding an entire wash or cast of a subtle color. Tinting can modify and balance the overall color balance of a photo, infusing it with a specific color or tone, such as blue or green. Tinting is generally best when it is kept subtle.
When it comes to editing your antique reproduction or photos, less is more, and save, if possible, every step of the way so that you can always go back to your photo in case anything happens. Try experimenting with editing using small touches and work your way up to experimenting with different modifications and effects to get the perfect image for you.
We hope you have enjoyed our beginner series on photographing your antiques or antique reproductions!
Our Advantages
-

Trustworthy Reputation.
Online businesses come and go, but our customers trust our 26 years of experience building fine furniture to deliver on our promises. Read our story and our customer reviews to see why people love Laurel Crown.
-

Quality is our Priority.
We don't take shortcuts. We like to do things the old-fashioned way and that includes the way we make our furniture. Fine hardwoods, solid joinery techniques, hand-tied upholstery—just a few ways we build our furniture to last through wear and tear over the years.
-

Yes, We Customize.
Don't see what you want? We'll work with you to design and build the perfect custom furniture for your individual home. Just want to change the upholstery or wood color? We do that too, just give us a call. We love doing custom projects for our customers!
-

100% Money-Back Guarantee.
We understand buying furniture online can be daunting so we offer a 100% money-back guarantee and no restocking fees on all orders except when customized or shipped internationally. We offer a satisfaction guarantee because we stand by the quality of our workmanship. And not only do we believe in our products, we use them too!